Monday, October 24, 2011

Class with the Amazing Mike McCarey

I got the chance to take two classes with the amazing Mike McCarey.  Mike is one of the top leading decorators in the country and has won several of the Food Network Challenges.  The highlight of the weekend was learning how to make Big Bird.  I'm not sure what I expected but it exceeded anything I could have imagined.  There was a lot of work involved and at times I didn't know if mine would turn out looking like a bird, but in the end it did.


Day one started with us learning about structures.  I'd not thought too much about them in the past but now I look at every new cake idea differently.  In order to make a strong structure you've got to be creative.  We used steel pipes, copper, pvc pipes, nuts and bolts.

Mike McCarey's wonderful assistant Mike posed so I could make sure I got the correct angle for Big Bird.


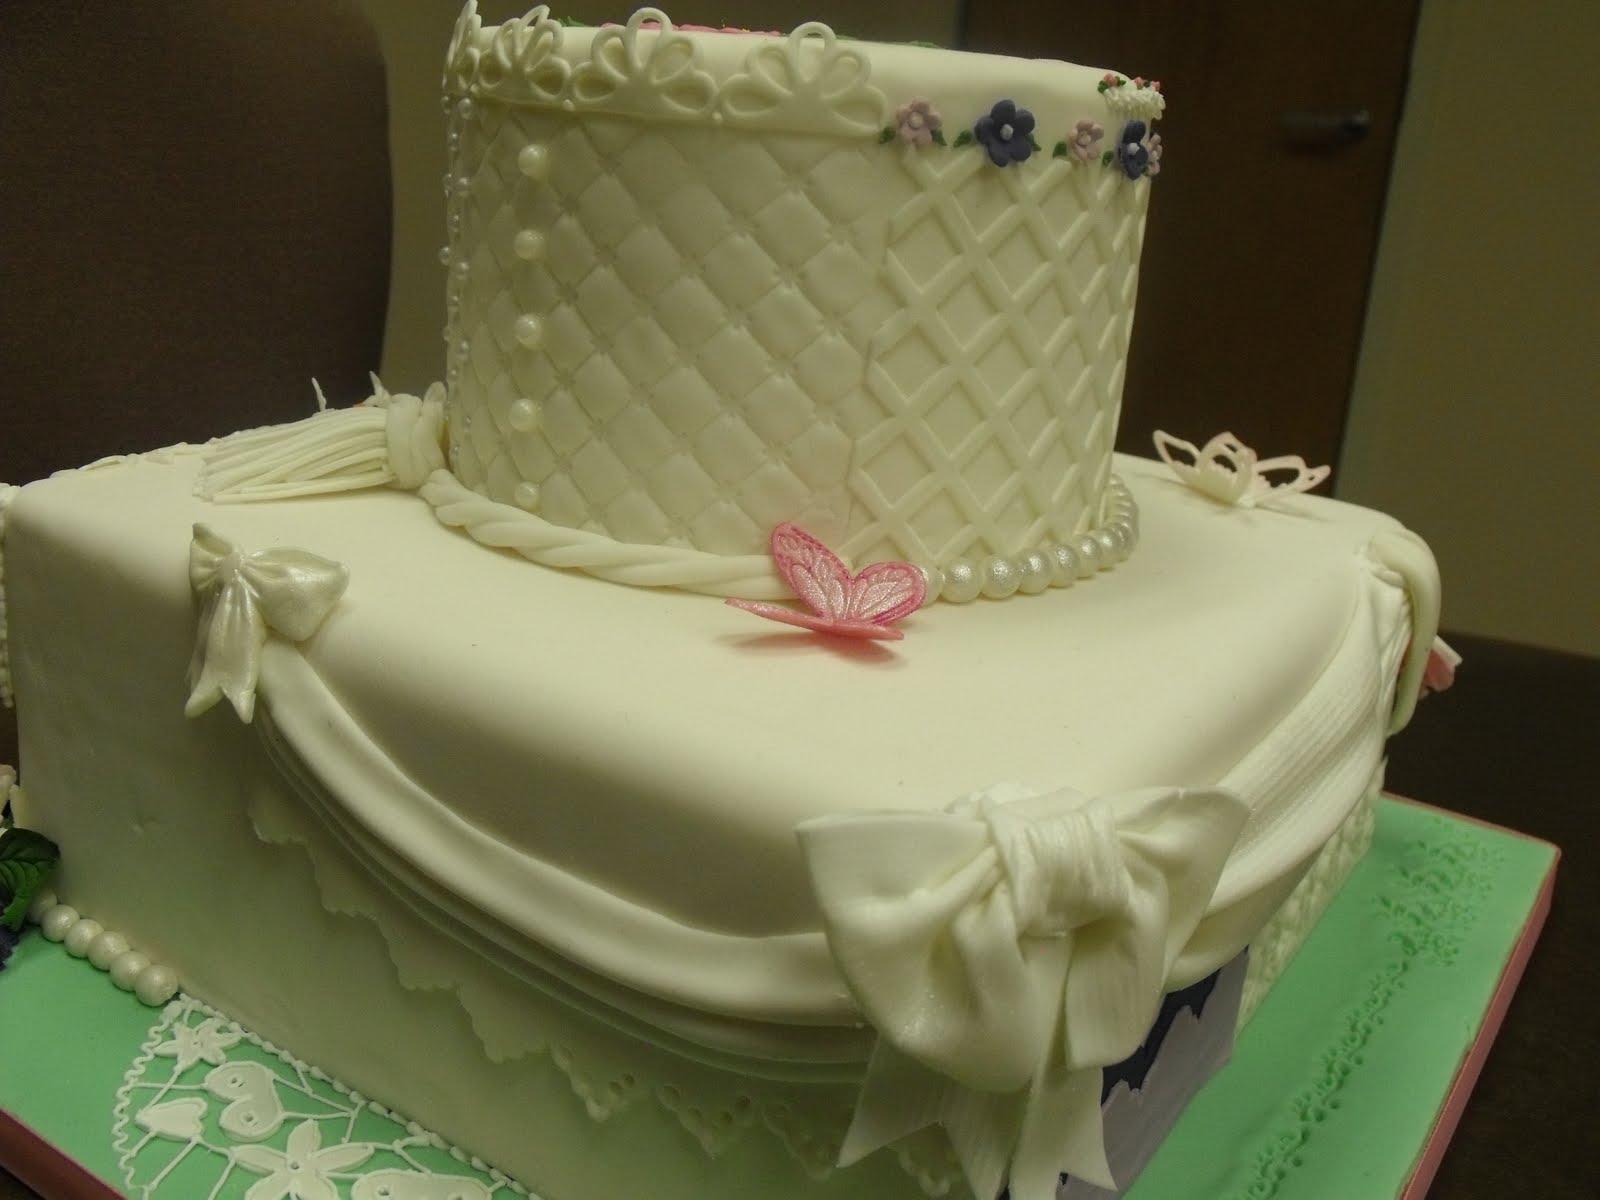
This should feed about 30 people depending on how you cut it.

After we made our structures it was time to 'load' the cake and sculpt Big Bird.  We used Mike's cake and icing which is quite a bit denser than mine but it made carving easy.  He stressed that each step is important to a successful outcome so we paid special attention to this step. Mike's assistant laughed at how delicate I was carving so he showed me how to be more intentional with my strokes.  The most important thing during this step is knowing when to stop.


With all the foundation steps out of the way it was time to dress the bird.  We used rolled fondant and  modeling chocolate to do the detail work.  I've never used modeling chocolate before but I'm hooked. It's easy to use, blend seams and is versatile.  The only drawback is it is affected by heat.  After 450 feathers, beak, eyes and big feet we have Big Bird!  I'm really proud of the finished product and I feel truly blessed to have taken the class.


I'm posing with Mike McCarey & my Big Bird.
 
Remember...450 individually applied feathers!


Side profile. 
 
  
I couldn't bring myself to cut him.


I can't wait to put into practice many of the techniques I've learned.  I've already got several ideas waiting to be realized.  Though it's a lot of work, it is sooo worth it in the end.

To God Be the Glory,
Lisa


Monday, September 26, 2011

Sabarria's 40th Birthday Cake

Over the Hill birthdays are my favorite events to do my people cakes for.  I get creative license in how I personalize the cake to the birthday person. 

This one was for Sabarria, a co-worker/friend, who turned 40.  Normally I create everything using buttercream icing but this time I chose rolled fondant.  It allowed me to get more detail in the eyes and mouth and a smooth texture in the clothing.  I didn't know Sabarria was going to wear black and white so it was neat to see she matched her Mini Me cake.  It took me longer than planned to make it but the end result was worth it.

Lisa


Sabarria loved her Mini Me cake!

Sunday, May 15, 2011

The Journey Begins

My cake journey began this week.   I had the pleasure of making my first cake, after years of retirement, for Tayler's graduation party.  Tayler is a talented, budding artist who will be attending Syracuse University in the fall.  Having known Tayler since she was a baby and having made the Cyprien's several cakes over the years, it was fun to be able to share in celebrating another milestone for their family.  At her party she had many of her art pieces on display and we were able to see just how talented and creative she is.

The only request was to tie in an art theme with maybe an artist's palette but other than that I had creative license to do as I wished.  I wanted to acknowledge where Tayler graduated from and where she would be attending college so I made sure to feature those school colors.  I started with a white rolled fondant base.  The fondant I used is from a Swiss company and the flavor is very good compared to other brands I've tried.  I moulded the decorative pieces out of chocolate fondant, gumpaste and rolled fondant. 

Most items I made the day before to allow time to harden.
Rolled fondant. I think my finish was pretty smooth.
I love making curly ribbons!
The palette was a combination of white and dark chocolate fondant.  I sketched out a pattern and used it to cut out the shape.


I glued all the components on
with piping gel and added the
Syracuse orange paint being
squeezed from the paint tube.


I was pleased with the end result and so were they.  It's amazing how God works.  I had no idea until after the fact that all Tayler wanted was a rolled fondant cake and that is exactly what I felt led to do. 
Lisa

Monday, May 2, 2011

What a Class!

Hi All,

Chef Nicholas Lodge and me w/ his sample cake.
Sorry it's been a minute since my last post. I've been very busy at work and as most of you know I recently took a cake decorating class.  I think they should call it Cake Bootcamp because it was non-stop and tough.  The teacher was Nicholas Lodge who is phenomenol.  His resume places him in the pastry art and cake art Hall of Fame.  In this bootcamp we learned so many techniques that my head was spinning.  
The picture to the right has his sample cake.  The pictures below are of mine. 


I loved making the bows and drapes below. 
They might appear on every cake I do.


On top of the cake is a large wild rose in a technique called Brushed Embroidery.  It's very similar to painting. I can't wait to try this in some more contempory designs. The tassel and the doves turned out great too.


This is my favorite side.  The ruffle drapes are adorable.


 This isn't a great shot and the graduating pearls on the corner look a little bit like a white catepillar that crawled out of the flower.
Carrie gave me a really nice compliment when she saw the cake. She said it looked more professional than any other cake I'd done. Wow!  I can't wait to get some more practice in.  I've also got my eye on a few more classes.  Stay tuned.


The Gang.  (Don't asking what Sebastian was laughing at.)


Sunday, April 3, 2011

Doggie Snap Shots

I've been practicing photographing the guys and just wanted to share some of my newest shots.  Let me know what you think. 

My two old men.

The Gang.  They love to be under the table.

Bella & Billingsley

This is how Bella sits all the time.

Little Man Sebastian

Guest Bathroom Quick Fix

I wanted to do something quick because if I tried to do something larger I was pretty sure I'd stall out.  I decided to hang a few things in my guest bathroom.  Being budget conscious, I'm just going to use things I have on hand. The only challenge is that most of my art is boxed and hard to get to.  I'll have to figure out how to get it because I have a few places that scream for art.

Here's how it went.

The bathroom on move in day.


How I warmed it up for Sheena :-)


Ok. Here's what I have to work with...

My old shower curtain. The colors are pretty crazy.


Painted masks from Bali


I hoped the mask would put a new spin on the 'dated' curtains.  Below is how everything came together. I had to add my favorite flower vase to the bathroom to add another punch of color.  Once I get the artwork in place I'll post new images.


It works for now and once the art goes in I think I can move on to something else... then come back to this... I think those mask would make an awesome headboard.  Hmmm, I just can't decide.   

Friday, April 1, 2011

April Fools!

Most people who know me well will think this is an April Fools' joke... me actually starting my blog.  I feel like a fool that its actually taken me this long to do something I truly desire, but better late than never.  Thanks Sheena for the final push. 

Since I moved into my house in December 2010 I haven't made much headway.  Too much work and too fatigued.  I thought that doing a blog to let friends and family see my progress would be a great way to get motivated to work on some of those projects.  So stay tuned and I promise to post my first project soon.

lisa

Home Sweet Home!